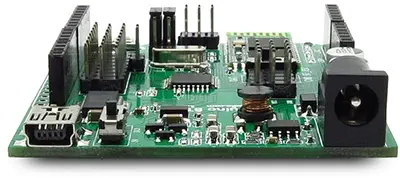
Iteaduino BT Bluetooth Arduino互換 マイクロコントローラ

¥3,679 値引き
iTead Studio商品コード:RB-Ite-124
メーカー #: IM120411006

価格  :
販売価格 ¥1,578 通常価格 ¥5,257

税込

送料はチェックアウト時に計算されます

特別注文品およびクリアランス品については、不良品である場合を除き、返品はお受けできません。不良品の場合、ロボショップの判断により修理もしくは交換等にて対応させていただきます。

支払いとセキュリティ

American Express Apple Pay Google Pay JCB Mastercard PayPal Shop Pay Visa

お客様の決済情報は安全に処理されます。当社はお客様のクレジットカード情報を保存せず、クレジットカード情報にアクセスすることもできません。

概要

  • Bluetooth通信用に設計されています。
  • Arduino Duemilanoveに基づいて
  • 3.3V / 5V動作電圧選択
  • 最大周波数:16MHz


Iteaduino BT Bluetooth Arduino互換 マイクロコントローラは、マスタ/スレーブBluetoothモジュールHC-05付きArduino互換ボードです。 Arduino Duemilanoveに基づいており、既存のプログラムやシールドと100%互換性がありますが、Bluetoothワイヤレス機能を備えています。消費電力は元のArduinoボードの約50%です。

Iteaduino BT Bluetooth Arduino互換マイクロコントローラ - クリックして拡大

特徴

  • Arduino UNO / Duemilanoveピン、穴および寸法と互換性があります
  • 7-23V DCから広い範囲の外部入力
  • センサとサーボ用にピンアウト
  • 3.3V / 5V動作電圧選択
  • 基板サイズ:75mm x 57mm
  • 重量:45.00g

ZIPファイル
ドキュメンテーション

  • マイクロコントローラ:ATMega328P
  • RAM容量:2K
  • フラッシュ容量:32K
  • I / O動作レベル:3.3V、5V
  • バージョン:1.1


外部リソース
- オンボード無線
- 電子レンガのインターフェース

電源
- 外部12V
- 外部24V
- 外部7V
- 外部9V
- USB 5V

•Arduino IDE>ボードタイプ

- Arduino IDEのTools> BoardメニューからATmega328付Arduino Duemilanove を選択して、スケッチをアップロードしてください。

Customer Reviews

Based on 2 reviews
0%
(0)
100%
(2)
0%
(0)
0%
(0)
0%
(0)
A
ALEXEY
It is difficult to make it work, but it works

It was very difficult, but I eventually made it work :) The problem was about 1) the documentation, and 2) the device version difference. The documentation is a disaster. Besides, there are at least two versions of the Iteaduino: v.1.0 and v.1.1 (I don't know anything about others). They are different, and so they require different jumper settings. This device works fine, provided that you use the correct settings. Here is what I discovered. 1) First of all, to load a sketch you MUST NOT use "Arduino UNO" setting from the Tools > Board menu in the Arduino IDE. The board looks like UNO, but is can't be programmed like UNO! Choose "Arduino Duemilanove w/ ATmega328" instead. 2) Look at the version of your device on the back side. It must be 1.0 or 1.1. You should use different jumper settings to program the device depending on the version of it. 3) The device has three working modes: a) PC connected to ATmega328 via USB - a "normal" Arduino mode. You load sketches and use a Serial port over USB in this mode. b) PC connected to HC-05 chip via USB - you change HC-05 Bluetooth chip settings using "AT" commands. c) PC connected to ATmega328 via Bluetooth - that's why you bought this board. You can't load sketches, but you can use a serial connection over Bluetooth to make an external Bluetooth device (PC, cell phone etc.) to communicate with your Iteaduino sketch program. 4) In mode a) you should use the following jumper/switch settings: jumpers: remove all jumpers; switch: any position, but it is more safe to set it to DAT. And when you upload a sketch, don't forget: it is a "Arduino Duemilanove w/ ATmega328", not "Arduino UNO". 5) To succeed in mode b), you must first UPLOAD A SKETCH which doesn't use a "Serial.begin()". You may use the simplest "Blink" sketch example from Arduino IDE. Of course, you must use mode a) described above to do it. Every time you want to change HC-05 settings you must first switch to mode a) and replace your current sketch with "Blink". (You can avoid sketch reloading if you have an option to make your sketch somehow to skip the Serial initialization.) I believe that this requirement is an Iteaduino BT design issue. In mode b) you should use the following jumper/switch settings (set them when the power is OFF!): jumpers: v.1.0: position "B". v.1.1: position "A". switch: position CMD. Connect a USB cable, open a serial terminal, set speed to 38400 and configure your device using AT commands. Every command should be terminated with CR and LF in this order (you may just use "Both NL & CR" option in Arduino IDE terminal window.) A description of of the AT command set can be found here: http://www.linotux.ch/arduino/HC-0305_serial_module_AT_commamd_set_201104_revised.pdf IMPORTANT: To successfully work in mode c) you sketch must initialize Serial to the same baud rate your HC-05 device uses! The HC-05 baud rate can be set using AT+UART command. I am not sure what value it is reset to by AT+ORGL. The HC-05 command spec I referred above says that it is 38400, but the same spec says that the default value of the baud rate is 9600. In my case, as I received the device, the initial baud rate was 9600. Note that changing the baud rate settings affects only the rate in mode c) but doesn't affect the rate in this configuration mode b): the last is still 38400 (provided that you switch modes and set jumpers when the power is OFF.) See more details by the link to the spec above. 6) In mode c) you should use the following jumper/switch settings (set them when the power is OFF!): jumpers: v.1.0: position "A". v.1.1: position "B". switch: position DAT. This is it. Hopefully I didn't forget something important. Good luck :)

C
Cy
Worked as planned

We used 20 of these to build a prototype of a medical device. They all worked and arrived super fast even though it said three were on back order, they all arrived together.

送料の見積り

こちらもあなたにおすすめ