Iteaduino BT Bluetooth Arduino Compatible Microcontroller

Save ¥4,010
iTead StudioSKU: RB-Ite-124
Manufacturer #: IM120411006

Price  :
Sale price ¥1,720 Regular price ¥5,730

Tax included Shipping calculated at checkout

Returns are not accepted on Special Order and Clearance Items except when they are found defective, in which case the product may be repaired or replaced at RobotShop's discretion.

Payments and Security

American Express Apple Pay Google Pay JCB Mastercard PayPal Shop Pay Visa

Your payment information is processed securely. We do not store credit card details nor have access to your credit card information.

Description

  • Designed for Bluetooth communication
  • Based on Arduino Duemilanove
  • 3.3V/5V Operating Voltage selection
  • Max frequency: 16MHz

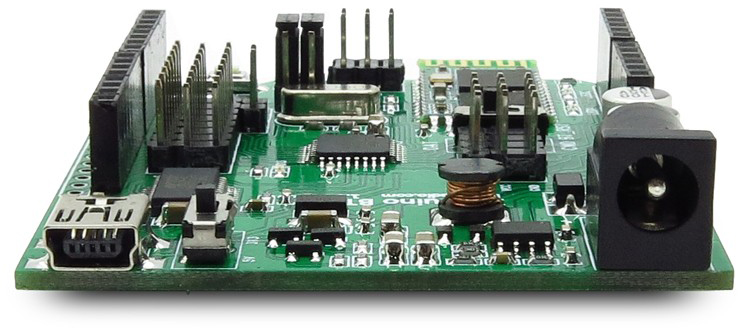
The Iteaduino BT Bluetooth Arduino Compatible Microcontroller is an Arduino compatible board with a master/slave Bluetooth Module HC-05. It based on Arduino Duemilanove, 100% compatible with its existing program and shields, but with the bluetooth wireless function. The power consumption is about 50% of the original Arduino boards.

Iteaduino BT Bluetooth Arduino Compatible Microcontroller - Click to Enlarge

Features

  • Compatible with Arduino UNO/Duemilanove pins, holes and dimensions
  • Wide range external input from 7-23V DC
  • Pins out for sensor and servo
  • 3.3V/5V operating voltage selection
  • Board size: 75mm x 57mm
  • Weight: 45.00g

ZIP File

Microcontroller: ATMega328P

  • RAM Capacity: 2K
  • FLASH Capacity: 32K
  • I/O Operation Level: 3.3V, 5V
  • Version: 1.1

External Resources

  • On-board Wireless
  • Electronic Brick Interface

Power Supply

  • External 12V
  • External 24V
  • External 7V
  • External 9V
  • USB 5V

Arduino IDE > Board Type

  • Please choose Arduino Duemilanove w/ ATmega328 from the Tools > Board menu in the Arduino IDE to upload your sketches.

Customer Reviews

Based on 2 reviews
0%
(0)
100%
(2)
0%
(0)
0%
(0)
0%
(0)
A
ALEXEY
It is difficult to make it work, but it works

It was very difficult, but I eventually made it work :) The problem was about 1) the documentation, and 2) the device version difference. The documentation is a disaster. Besides, there are at least two versions of the Iteaduino: v.1.0 and v.1.1 (I don't know anything about others). They are different, and so they require different jumper settings. This device works fine, provided that you use the correct settings. Here is what I discovered. 1) First of all, to load a sketch you MUST NOT use "Arduino UNO" setting from the Tools > Board menu in the Arduino IDE. The board looks like UNO, but is can't be programmed like UNO! Choose "Arduino Duemilanove w/ ATmega328" instead. 2) Look at the version of your device on the back side. It must be 1.0 or 1.1. You should use different jumper settings to program the device depending on the version of it. 3) The device has three working modes: a) PC connected to ATmega328 via USB - a "normal" Arduino mode. You load sketches and use a Serial port over USB in this mode. b) PC connected to HC-05 chip via USB - you change HC-05 Bluetooth chip settings using "AT" commands. c) PC connected to ATmega328 via Bluetooth - that's why you bought this board. You can't load sketches, but you can use a serial connection over Bluetooth to make an external Bluetooth device (PC, cell phone etc.) to communicate with your Iteaduino sketch program. 4) In mode a) you should use the following jumper/switch settings: jumpers: remove all jumpers; switch: any position, but it is more safe to set it to DAT. And when you upload a sketch, don't forget: it is a "Arduino Duemilanove w/ ATmega328", not "Arduino UNO". 5) To succeed in mode b), you must first UPLOAD A SKETCH which doesn't use a "Serial.begin()". You may use the simplest "Blink" sketch example from Arduino IDE. Of course, you must use mode a) described above to do it. Every time you want to change HC-05 settings you must first switch to mode a) and replace your current sketch with "Blink". (You can avoid sketch reloading if you have an option to make your sketch somehow to skip the Serial initialization.) I believe that this requirement is an Iteaduino BT design issue. In mode b) you should use the following jumper/switch settings (set them when the power is OFF!): jumpers: v.1.0: position "B". v.1.1: position "A". switch: position CMD. Connect a USB cable, open a serial terminal, set speed to 38400 and configure your device using AT commands. Every command should be terminated with CR and LF in this order (you may just use "Both NL & CR" option in Arduino IDE terminal window.) A description of of the AT command set can be found here: http://www.linotux.ch/arduino/HC-0305_serial_module_AT_commamd_set_201104_revised.pdf IMPORTANT: To successfully work in mode c) you sketch must initialize Serial to the same baud rate your HC-05 device uses! The HC-05 baud rate can be set using AT+UART command. I am not sure what value it is reset to by AT+ORGL. The HC-05 command spec I referred above says that it is 38400, but the same spec says that the default value of the baud rate is 9600. In my case, as I received the device, the initial baud rate was 9600. Note that changing the baud rate settings affects only the rate in mode c) but doesn't affect the rate in this configuration mode b): the last is still 38400 (provided that you switch modes and set jumpers when the power is OFF.) See more details by the link to the spec above. 6) In mode c) you should use the following jumper/switch settings (set them when the power is OFF!): jumpers: v.1.0: position "A". v.1.1: position "B". switch: position DAT. This is it. Hopefully I didn't forget something important. Good luck :)

C
Cy
Worked as planned

We used 20 of these to build a prototype of a medical device. They all worked and arrived super fast even though it said three were on back order, they all arrived together.

Estimate shipping

You may also like